Granite countertop repair is the process of using color-matched epoxy or UV-cured acrylic resin to restore chips, cracks, and scratches in natural stone surfaces, bringing them back to full function and a clean appearance. Most homeowners encounter three types of damage: small surface chips from dropped cookware, hairline cracks from thermal stress or inadequate support, and edge fractures near sink cutouts. DIY repair kits cost $20 to $30 and handle minor surface damage well. Professional granite repair services address structural cracks and complex edge damage, with costs ranging from $150 to $800 or more depending on severity. This guide covers both paths clearly.
What tools and materials you need for granite countertop repair
The right materials determine whether a repair blends in or stands out. For most granite surface repair projects, you need a two-part epoxy or UV-cured acrylic resin kit, acetone or isopropyl alcohol for cleaning, painter’s tape, mixing sticks, a razor blade or scraper, wet-dry sandpaper in grits from 400 to 3000, and a granite sealer for finishing. Tinting pigments are available in most repair kits and allow you to adjust the resin color to match your stone’s base tone and veining pattern.

The comparison below covers the three main repair kit types available in 2026:
| Kit type | Best for | Cure time | Approximate cost |
|---|---|---|---|
| Two-part epoxy | Chips, cracks, edge repairs | 2 to 24 hours full cure | $20 to $30 |
| UV-cured acrylic resin | Small surface chips, fast repairs | Under 5 minutes with UV lamp | $25 to $35 |
| Color-matched filler paste | Cosmetic scratches, shallow chips | 1 to 2 hours | $15 to $25 |
Safety gear is not optional. Wear nitrile gloves and eye protection when mixing resins, since uncured epoxy is a skin sensitizer with repeated exposure. Work in a ventilated space when using acetone as a cleaning agent.
Pro Tip: Before purchasing a tinted kit, photograph your granite under natural light and bring the photo to a stone supply store. Matching the background color and the secondary vein color separately produces far more convincing results than relying on a single-tone filler.
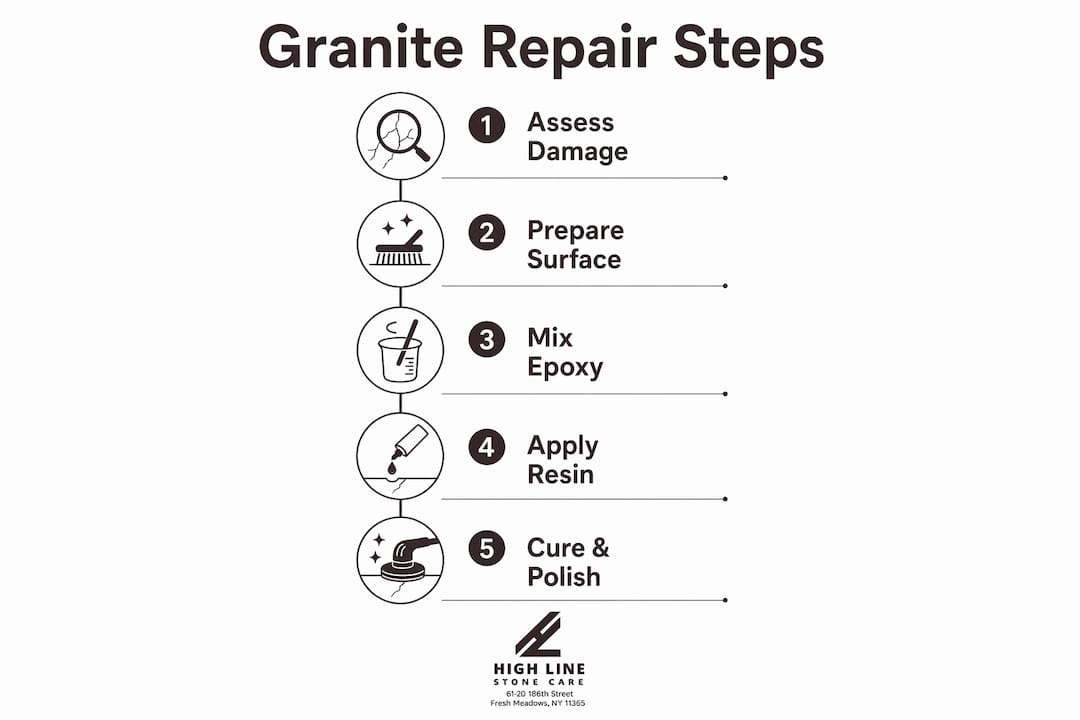
How to repair chips in granite countertops step by step
Small chips about the size of a fingernail on flat granite surfaces are the most manageable DIY repair. The process requires patience and precision, not specialized tools. Follow these steps in order.
-
Clean the damaged area. Wipe the chip and surrounding surface with acetone or isopropyl alcohol on a lint-free cloth. Remove all grease, cleaning residue, and moisture. Allow the area to dry completely before proceeding.
-
Apply painter’s tape. Mask the area around the chip with painter’s tape, leaving only the damaged zone exposed. This prevents resin from spreading onto the polished surface and reduces cleanup time significantly.
-
Mix the epoxy or resin. Follow the manufacturer’s ratio exactly. Add tinting pigments in small increments, mixing thoroughly between additions. Test the color on a white surface before applying it to the stone.
-
Fill the chip slightly proud. Apply the mixed resin into the chip using a toothpick or fine applicator. Overfill slightly above the surface level. Epoxy shrinks as it cures, so underfilling produces a visible depression after hardening.
-
Allow proper curing time. Epoxy reaches handling strength in 30 to 60 minutes and achieves full cure in 2 to 24 hours depending on the product and ambient temperature. Do not sand or disturb the repair during this window.
-
Level the cured repair. Use a single-edge razor blade held flat against the surface to shave the excess resin flush. Work slowly and at a low angle to avoid scratching the surrounding polish.
-
Sand and polish. Progress through wet-dry sandpaper from 400 grit up to 1500 or 2000 grit, keeping the paper wet throughout. Finish with a granite polishing compound applied with a soft cloth to restore the sheen.
The final result on a flat surface chip will reduce visibility substantially. Under direct light, a slight color variation may remain, particularly on granite with complex veining. Setting realistic expectations before you start prevents disappointment after the work is done.
Pro Tip: If your granite has a high-gloss finish, apply a small amount of mineral oil to the repaired area after polishing. It temporarily reveals how well the color match holds before the final sealer goes on, giving you a chance to adjust if needed.
How to repair cracks in granite countertops and when to call a professional
Cracks in granite fall into two distinct categories, and treating them the same way is a common and costly mistake. Hairline surface cracks are shallow fractures that do not penetrate the full thickness of the slab. Structural cracks run through the stone’s depth and often signal an underlying support problem.
For hairline cracks, the repair process mirrors chip repair with one key difference: use a low-viscosity epoxy rather than a standard two-part filler. Low-viscosity resin flows into the narrow crack channel by capillary action, filling the void more completely than a thicker compound. Clean the crack with acetone, apply painter’s tape along both sides, and introduce the resin with a syringe or fine-tip applicator. Allow full cure before sanding flush and resealing.
Filling cracks without correcting support or stress issues causes repair failure. If the crack appeared after heavy impact or if the countertop spans a cabinet gap without adequate support, the epoxy will re-fracture within weeks. Structural reinforcement, not resin, solves that problem.
Call a professional granite repair service when you encounter any of the following situations:
- The crack runs through the full thickness of the slab
- The crack is located near a sink cutout, seam, or unsupported span
- The two sides of the crack sit at different heights (a sign of movement)
- The crack is longer than six inches
- Previous DIY repair has already failed once
Professional crack repair costs $150 to $500, and structural repairs run $300 to $800 or more. That figure is still well below full slab replacement, which typically starts at $1,500 for a standard kitchen layout. Viewed that way, professional intervention on a serious crack is a sound investment.
Pro Tip: Before calling a fabricator, photograph the crack from multiple angles in both natural and artificial light. A good photo helps the technician assess severity remotely and provide a more accurate quote before the site visit.
How to handle edge chips, sink cutouts, and other tricky granite damage
Edges, corners, and the curved perimeter of sink cutouts are the most structurally stressed zones in any granite countertop. These areas typically require professional repair and tools beyond what a homeowner can reasonably access. The reasons are practical, not arbitrary.
Edge profiles, whether eased, bullnose, or ogee, require grinding and polishing equipment to restore their shape after a chip. Applying filler to a broken edge without reshaping it produces a flat, dull patch that draws the eye rather than hiding the damage. Sink cutout chips carry additional risk: the curved geometry concentrates stress, and an improperly filled chip can propagate into a full crack under normal use.
That said, a temporary fix is sometimes appropriate while you arrange professional service:
- Apply clear epoxy to stabilize the chip and prevent further breakage from daily contact
- Avoid placing heavy objects near the damaged edge
- Keep the area dry to prevent moisture from working into the fracture
The following situations at edges and cutouts call for a fabricator rather than a DIY attempt:
- Any chip larger than a thumbnail on a finished edge profile
- Chips that expose the raw, unpolished underside of the slab
- Damage within two inches of a sink cutout
- Corners where two finished edges meet
Protecting these zones after repair is straightforward. Place a silicone edge guard on corners near high-traffic areas, and avoid sliding heavy pots across the surface toward the edge. Prevention costs nothing; re-repair does.
Maintenance and prevention tips to extend your granite countertop’s life after repair
Sealing granite after repair protects the stone from moisture intrusion and helps the repaired area blend visually with the surrounding surface. Apply a penetrating impregnating sealer within 24 hours of completing any repair, once the epoxy has fully cured. Most residential granite benefits from resealing once a year, though heavily used surfaces may need attention every six months.
Beyond sealing, daily habits determine how long your countertop stays in good condition:
- Do use pH-neutral stone cleaners like Method Stone Cleaner or Black Diamond Stone Cleaner for daily wiping
- Do place trivets under hot pans. Granite tolerates heat, but thermal shock from a 500°F pan on a cold surface can initiate hairline cracks
- Do use cutting boards. Knives do not scratch granite easily, but the impact of repeated chopping can chip the surface near edges
- Don’t use vinegar, lemon juice, or bleach-based sprays. These acids etch the sealer and, over time, dull the polished surface
- Don’t sit or stand on the countertop. Granite is strong in compression but brittle under point loads and flexion
- Don’t allow standing water near seams or cutouts. Water that penetrates an unsealed seam can weaken the adhesive bond beneath
For property managers overseeing multiple units, a granite countertop maintenance schedule documented in your property records reduces reactive repair costs significantly. Catching a failing seal early is far less expensive than addressing the staining or cracking that follows.
Key takeaways
Effective granite countertop repair depends on matching the repair method to the damage type: surface chips and hairline cracks suit DIY epoxy techniques, while structural cracks and edge damage require professional intervention to avoid failure.
| Point | Details |
|---|---|
| Match method to damage | Use two-part epoxy for chips and hairline cracks; call a professional for structural or edge damage. |
| Cure time matters | Epoxy reaches handling strength in 30 to 60 minutes but needs 2 to 24 hours for full cure before finishing. |
| Seal after every repair | Apply a penetrating impregnating sealer within 24 hours of completing any repair to protect and blend the surface. |
| Know when to stop DIY | Cracks near sink cutouts, seams, or spanning unsupported areas require a fabricator, not a filler kit. |
| Prevention reduces cost | Trivets, pH-neutral cleaners, and annual resealing prevent the majority of common granite damage. |
What I’ve learned from watching homeowners repair granite
After years of working with natural stone surfaces across New York City properties, one pattern stands out clearly. Homeowners consistently overestimate what a $25 repair kit can accomplish and underestimate how much preparation determines the result. The repair itself takes twenty minutes. The cleaning, taping, color matching, and curing take two hours. Skipping any part of that preparation is where most DIY attempts fall short.
DIY repairs reduce damage visibility but rarely make it invisible. That is not a flaw in the kits. It is the nature of natural stone, where every slab has a unique pattern that no pre-mixed tint can replicate perfectly. Professional repairs use tinted resins and polishing techniques that come far closer to invisible, particularly on dark or heavily veined granite where color variation is more obvious.
The decision I encourage homeowners to make honestly is this: evaluate the chip or crack under direct light before picking up a kit. If you can see it clearly from standing height during normal kitchen use, a DIY repair will reduce but not eliminate that visibility. If the damage is on an edge, near a seam, or accompanied by any flexion in the slab, stop and call a professional. The cost of a failed DIY attempt on a structural crack is always higher than the cost of getting it right the first time.
— High
When professional granite repair services make the difference
For damage that goes beyond what a repair kit can address, Highlinestonecare provides professional granite repair and stone restoration services across New York City and surrounding areas. Professional technicians bring color-matched resin systems, diamond polishing equipment, and structural assessment tools that produce results no consumer kit can replicate.
Whether you are dealing with a structural crack near a sink cutout, a chipped edge profile, or a surface that needs full stone restoration in NYC, Highlinestonecare’s team evaluates the damage and recommends the right course of action without overselling unnecessary work. Complex damage assessed and repaired by a specialist protects the long-term value of your countertop and avoids the compounding cost of repeated DIY attempts on a problem that needed professional attention from the start.
FAQ
What is the best material for granite countertop repair?
Two-part epoxy is the most widely used material for granite countertop repair because it bonds strongly to stone, accepts tinting pigments for color matching, and cures to a hard, sandable finish. UV-cured acrylic resin is a faster alternative for small surface chips.
How long does a DIY granite chip repair take?
The hands-on work takes 20 to 30 minutes, but epoxy requires 2 to 24 hours for full cure before you can sand and polish the repair. Plan for the countertop to be out of use for at least half a day.
Can you repair granite countertops yourself or do you need a professional?
Small chips on flat surfaces are suitable for DIY repair using a color-matched epoxy kit. Structural cracks, edge chips, and damage near sink cutouts require professional repair to avoid failure and further damage.
How much does professional granite countertop repair cost?
Professional repair for surface cracks costs $150 to $500, while structural repairs run $300 to $800 or more. Both options remain significantly less expensive than full slab replacement.
How do you prevent granite countertops from chipping after repair?
Use trivets under hot cookware, avoid sliding heavy objects across edges, and apply a penetrating impregnating sealer annually. These three practices address the most common causes of new chip and crack formation on repaired granite surfaces.
Recommended
- Countertop repair Westchester | Trusted services – Highline Stone Care
- Countertop Repair Rockland County | Reliable Results – Highline Stone Care
- Granite Countertop Restoration | High Line Stone Care