Marble restoration is defined as a mechanical process of honing away surface damage and polishing the stone back to its original finish, followed by sealing to protect the renewed surface. Knowing how to restore marble correctly means you can recover etched countertops, dull floors, and scratched vanity tops without replacing them. The process relies on diamond-impregnated polishing pads, pH-neutral stone cleaners, and impregnating sealers, all applied in a precise sequence. Done right, restoration extends the life of marble significantly and preserves the investment you have made in your home or property.
How to restore marble: understanding the full process
Marble restoration involves two core phases: honing to remove the damaged top layer and polishing to rebuild the shine. This is not a cosmetic cover-up. The process physically removes the compromised surface material and recreates the finish from scratch. That distinction matters because it means restoration addresses the root cause of dullness and etching rather than masking it temporarily.
The advantages of marble restoration over full replacement are significant. Replacement involves demolition, disposal, and reinstallation costs that can run into thousands of dollars for a single countertop or floor section. Restoration, by contrast, recovers the same surface at a fraction of that cost while preserving the original stone’s character, veining, and color. For brownstone marble restoration in Brooklyn and high end stone restoration projects across New York City, this approach is the standard professional choice.
Sealing is the final and non-negotiable step. A quality impregnating sealer penetrates the stone’s pores and slows the absorption of liquids, giving you time to wipe up spills before they stain. The sealer does not change the marble’s appearance but protects the finish you have just worked to restore.
What causes marble damage and how do you assess it?
Marble is calcium carbonate, which reacts chemically with acids. A drop of lemon juice, wine, or even a common household cleaner like vinegar causes etching on marble by dissolving the surface at a microscopic level. The result is a dull patch or ring that cannot be wiped away because the damage is structural, not superficial.
The most common types of marble surface damage include:
- Etching: Dull, slightly rough patches caused by acid contact. The most frequent damage type on kitchen countertops and bathroom vanities.
- Scratches: Linear marks from abrasive contact, such as dragging cookware or grit tracked across floors.
- Staining: Discoloration from oils, rust, or organic matter absorbed into the stone’s pores.
- Residue buildup: A cloudy film left by soap, wax-based cleaners, or topical sealers that have degraded over time.
To assess damage depth, use two simple tests. First, hold a flashlight at a low angle across the surface. This raking light technique reveals scratches and gloss differences that overhead lighting completely hides. Second, run your fingernail across a dull area. If you feel a slight texture change or depression, the damage has penetrated beyond the surface polish and will require honing before polishing can restore the shine.
Pro Tip: If the dull area feels smooth to the fingernail but looks hazy, it is likely a residue or sealer film issue rather than true etching. A pH-neutral cleaner and light buffing may resolve it without full restoration.
Knowing the damage type before you start determines the entire approach. Matching the restoration method to the specific damage type yields the best results and prevents unnecessary material removal.
What tools and products do you need for marble restoration?
Gathering the right materials before you start prevents mid-project delays and protects the stone from further damage caused by improvised substitutions.
| Tool or Product | Purpose |
|---|---|
| Diamond polishing pads (400 to 3000 grit) | Progressive abrasion to hone and polish the surface |
| pH-neutral stone cleaner | Safe cleaning without acid or alkaline damage |
| Marble polishing compound or powder | Final shine restoration after diamond pad sequence |
| Impregnating sealer | Penetrating protection against stain absorption |
| Variable-speed polisher or hand buffer | Controlled application of pads and compounds |
| Microfiber cloths and buffing pads | Sealer application and compound removal |
| Safety glasses and nitrile gloves | Personal protection during chemical and abrasive work |
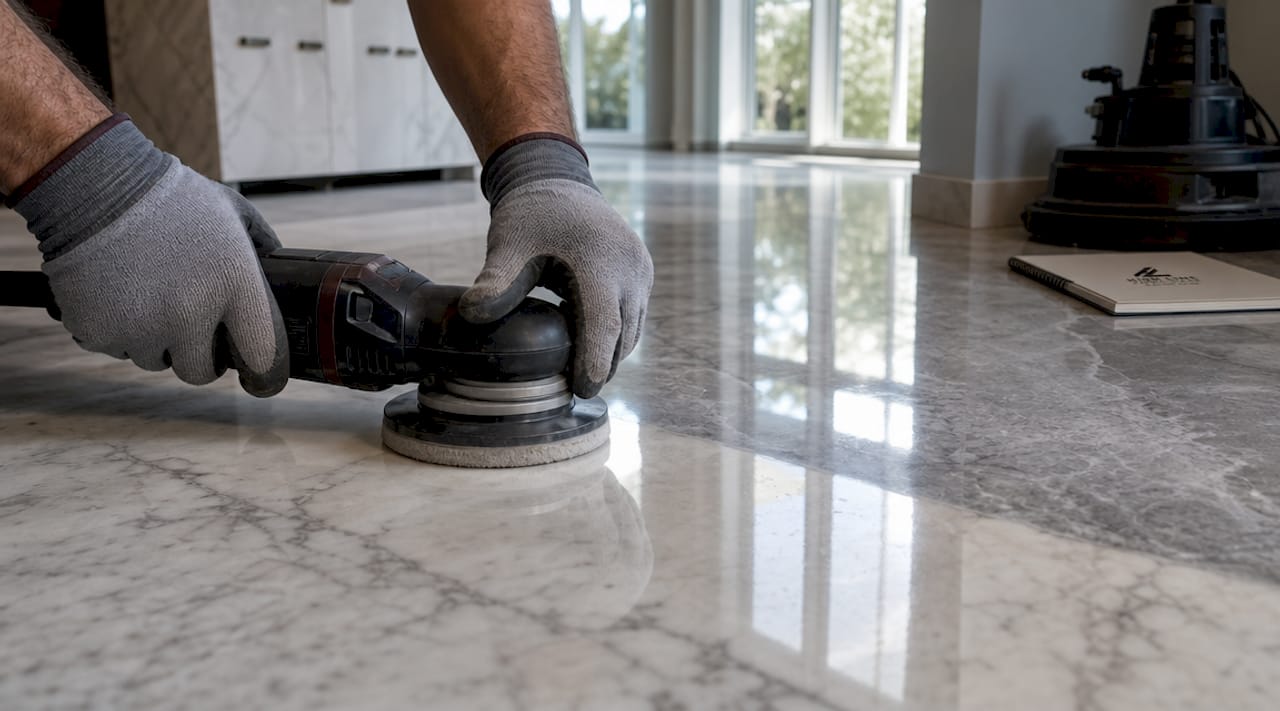
Diamond-impregnated polishing pads are the core tool. They are available in grits from 50 (aggressive material removal) through 3000 (near-mirror finish). For most homeowner restoration projects, starting at 400 grit is appropriate unless deep scratches are present. Polishing compounds and creams, such as those used in professional marble repair in NYC, provide the final gloss after the diamond pad sequence is complete.
The choice between an impregnating sealer and a topical sealer is critical. Impregnating sealers penetrate below the surface and do not alter the stone’s appearance. Topical sealers sit on top and can yellow, peel, or create a plastic-looking film over time. For any quality restoration, an impregnating sealer is the correct choice.
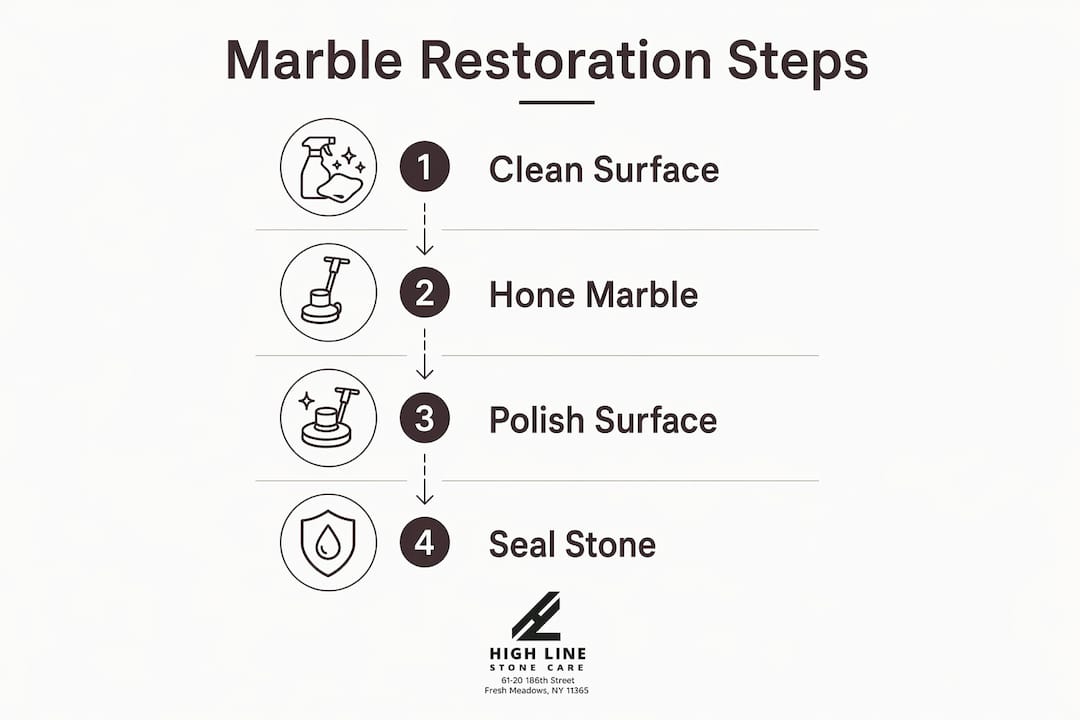
Step-by-step marble restoration process
This four-phase process covers the full marble restoration process from initial cleaning through final sealing.
Phase 1: thorough surface cleaning
Start by removing all surface contamination. Use a pH-neutral stone cleaner, not dish soap or all-purpose spray, both of which can leave residue or cause minor etching. Wipe the surface dry with a clean microfiber cloth and allow it to air dry completely. Any moisture remaining on the surface will interfere with both polishing and sealing.
Phase 2: honing with diamond pads
- Attach a 400-grit diamond pad to your variable-speed polisher or use it by hand with water as a lubricant.
- Work in overlapping circular passes across the damaged area, keeping the pad flat against the surface.
- After completing the 400-grit pass, wipe the surface clean and inspect under raking light to confirm scratches from the previous damage are gone.
- Move to 800-grit and repeat the process. Each grit removes the scratches left by the previous, coarser grit.
- Continue through 1500-grit and then 3000-grit, cleaning and inspecting between each step.
Skipping intermediate grit steps leaves coarse scratches visible under the final polish. This is one of the most common errors in DIY restoration and the hardest to correct after the fact.
Pro Tip: Professional restoration uses variable-speed polishers at controlled RPMs matched to each grit type. Higher speeds suit coarser grits for material removal; lower speeds suit finer grits for surface refinement. If using a hand-held polisher, reduce speed as you progress to finer grits.
Phase 3: applying polishing compound
After the 3000-grit pass, apply a marble polishing compound or powder to the surface. Work it in with a clean buffing pad using slow, circular motions. Polishing powder applied with a damp cloth in circular motions can restore light etching and dull spots effectively, making it a practical option for smaller areas. For larger surfaces, a polishing cream applied with a low-speed buffer produces a more consistent result. Wipe away residue with a clean microfiber cloth and inspect the finish under raking light before proceeding.
Phase 4: sealing the restored surface
| Sealing Step | Key Detail |
|---|---|
| Confirm surface is dry | Moisture causes poor penetration and visible residue |
| Apply sealer in thin, even coats | Avoid pooling, which leads to white haze marks |
| Allow penetration time | Follow product instructions, typically 5 to 15 minutes |
| Wipe off all excess sealer | Residual sealer on the surface causes haze requiring buffing |
| Allow full cure before use | Most sealers require 24 hours before the surface is used |
Proper sealer application requires a completely dry surface. Any moisture trapped beneath the sealer prevents full penetration and leaves a cloudy residue. Wipe off all excess sealer before it dries on the surface. Leftover sealer residue creates white haze marks that require additional buffing to remove.
Common mistakes that compromise marble restoration
Even experienced DIYers make errors that undo hours of careful work. These are the most damaging:
- Using acidic or abrasive cleaners: Products like vinegar, bleach, or scouring powders damage marble chemically, causing the same etching you are trying to remove. Use only pH-neutral stone cleaners throughout the process.
- Skipping grit steps: Jumping from 400-grit directly to 3000-grit leaves coarse scratches that the fine grit cannot remove. Follow the full sequence without shortcuts.
- Sealing damp marble: Moisture causes poor sealer penetration and visible residue. Allow the surface to dry completely, ideally for several hours, before applying any sealer.
- Spot treating instead of full-surface restoration: Polishing a single etch mark without blending into the surrounding area creates a visible sheen difference. Always feather out to the full surface or panel.
- Over-polishing one area: Spending too long on a single spot removes more material than surrounding areas, creating a low spot or uneven gloss that is difficult to correct.
When damage is deep, covers a large area, or involves cracking and structural issues, professional evaluation is the right call. Marble repair in NYC and marble restoration New York projects involving historic stone or luxury installations benefit significantly from professional assessment before any DIY work begins.
How do you maintain marble after restoration?
Maintenance after restoration is what determines how long your results last. The following practices protect the finish and delay the need for future restoration work.
- Clean up spills immediately. Acidic liquids like citrus juice, wine, and coffee begin etching marble within minutes. Sealers slow absorption but do not stop the acid-calcium carbonate reaction that causes etching. Quick cleanup remains the most effective protection.
- Use pH-neutral cleaners exclusively. Wipe down marble surfaces with a dedicated stone cleaner or plain warm water. Avoid dish soap, which leaves a film, and never use vinegar-based sprays.
- Test your sealer annually. Place a few drops of water on the surface and observe. If absorption occurs within 2 to 3 minutes, the sealer has degraded and reapplication is needed. Base reapplication on this water drop test, not a fixed calendar schedule.
- Use protective accessories. Coasters under glasses, trivets under hot cookware, and cutting boards on marble countertops prevent the majority of daily damage.
- Schedule routine inspections. Check for new etch marks or dull spots every few months. Addressing minor damage early with a polishing powder prevents it from requiring full honing later.
Pro Tip: For an eco-friendly approach to ongoing stone care, natural stone restoration guides recommend plant-based pH-neutral cleaners that are safe for marble and household surfaces alike.
Key takeaways
Restoring marble requires honing to remove surface damage, polishing through a progressive grit sequence, and sealing with an impregnating sealer to protect the renewed finish.
| Point | Details |
|---|---|
| Assess before you act | Use raking light and the fingernail test to identify damage type and depth before choosing a method. |
| Follow the full grit sequence | Progress from 400 through 3000 grit without skipping steps to avoid leaving coarse scratches under the final polish. |
| Seal on a dry surface | Apply impregnating sealer only after the marble is completely dry to prevent haze and poor penetration. |
| Sealers do not stop etching | Impregnating sealers slow stain absorption but do not prevent acid damage; immediate spill cleanup is still required. |
| Test sealer annually | Use the water drop test to determine when reapplication is needed rather than relying on a fixed schedule. |
What I have learned from years of marble restoration work
After working with marble surfaces across residential and commercial properties in New York City, one pattern stands out clearly. Homeowners who address damage early spend a fraction of what those who wait end up paying. A small etch mark treated with polishing powder costs almost nothing. The same spot, ignored for two years and expanded by repeated acid contact, may require professional honing across the entire surface.
The second consistent observation is about sealers. Many property owners believe that sealing marble makes it acid-proof. It does not. Sealers only slow absorption; they do not stop the chemical reaction between acid and calcium carbonate. This misconception leads to complacency, and complacency leads to etching that could have been prevented with a quick wipe.
Tool choice matters more than most guides acknowledge. A variable-speed polisher gives you control that a fixed-speed tool simply cannot provide. Using the wrong speed at the wrong grit stage either removes too much material or fails to remove enough, both of which create problems that require additional correction. Investing in the right equipment, or hiring professionals who already have it, produces results that last.
The most effective outcomes I have seen combine informed DIY maintenance with periodic professional restoration. Homeowners who clean correctly, test their sealers, and call in professionals for deep honing when needed keep their marble looking exceptional for decades.
— High
Restore your marble with Highlinestonecare
Highlinestonecare provides advanced marble restoration and care services across New York City, covering polishing, honing, and sealing for residential and commercial properties. Whether you are managing a brownstone in Brooklyn or a luxury apartment with high end stone surfaces, Highlinestonecare’s team matches the restoration approach to your marble’s specific condition. Their Opal Luxury Anti-Acid Permanent Sealer offers lasting protection against etching and staining in a single application. For marble countertops, floors, and vanities that need professional attention, explore marble restoration NYC services or contact Highlinestonecare directly for a consultation tailored to your property.
FAQ
What is the first step in restoring marble?
The first step is a thorough cleaning with a pH-neutral stone cleaner to remove all surface contamination before any honing or polishing begins. Starting on a dirty surface embeds debris into the stone during the abrasion process.
Can I restore marble without professional tools?
Light etching and dull spots can be improved using marble polishing powder applied with a damp cloth in circular motions, requiring no power tools. Deeper scratches and large surface areas require diamond polishing pads and a variable-speed polisher for consistent results.
How often should marble be resealed?
Resealing frequency depends on use and sealer condition, not a fixed schedule. Perform the water drop test annually: if water absorbs into the surface within 2 to 3 minutes, it is time to reseal.
Does sealing marble prevent etching?
No. Impregnating sealers protect against stain absorption but do not prevent acid etching. The acid-calcium carbonate reaction that causes etching occurs at the surface level regardless of sealer presence, which is why immediate spill cleanup remains critical.
When should I hire a professional for marble restoration?
Hire a professional when damage covers a large area, involves deep scratches, structural cracks, or historic stone. Professional marble restoration in New York also makes sense when a DIY attempt has produced uneven results that require correction across the full surface.