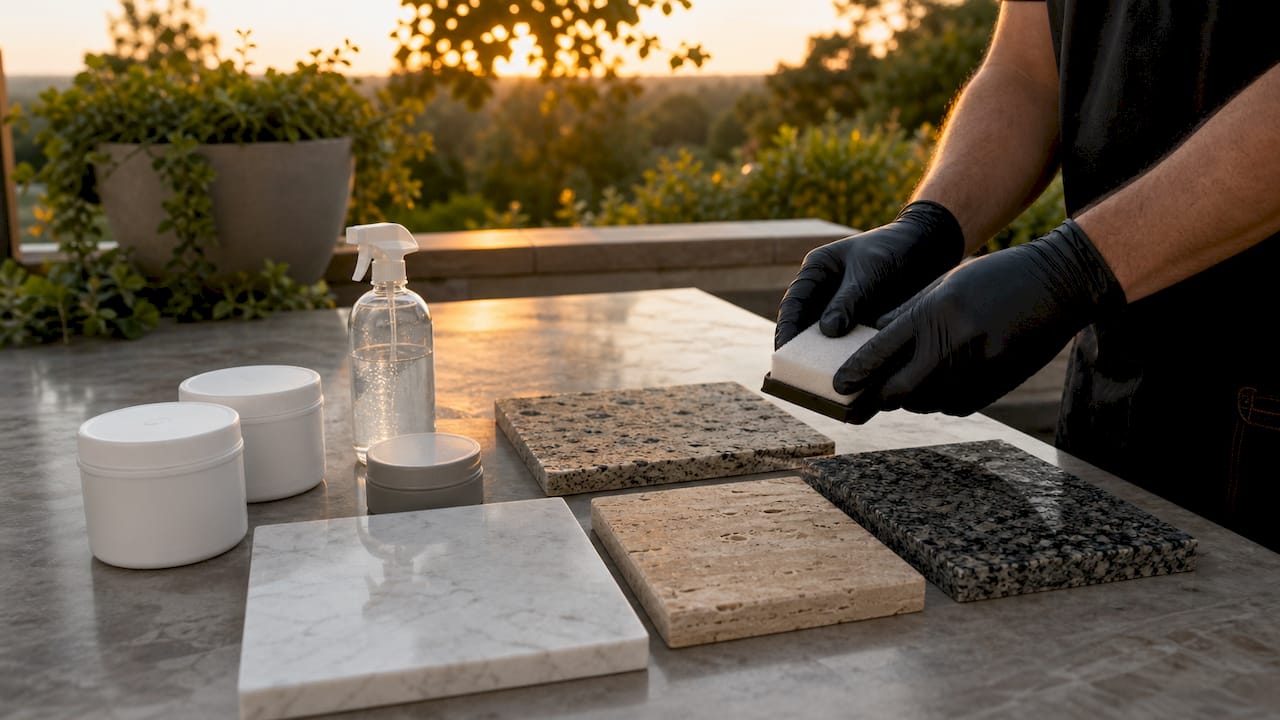
The interior designers stone care process is the systematic workflow of cleaning, sealing, inspecting, and maintaining natural stone surfaces to preserve their structural integrity and visual quality over time. Marble, travertine, granite, and limestone each demand material-specific protocols. Skipping or rushing any stage produces etching, staining, or surface degradation that no amount of polishing can fully reverse. The role of interior designers in stone choices extends well beyond material selection. It includes specifying the correct cleaning chemistry, sealing schedule, and maintenance handoff documentation from day one.
What does the interior designers stone care process involve?
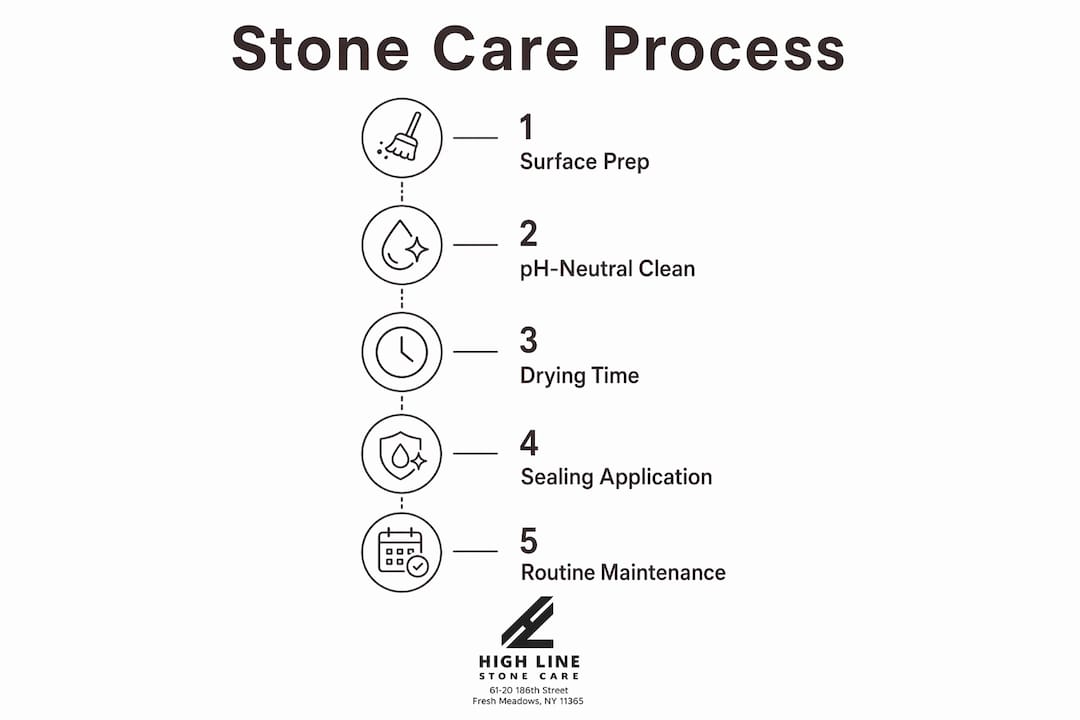
The stone care process in professional interior design is formally known as a stone maintenance program. It covers four sequential stages: surface preparation, cleaning, sealing, and scheduled maintenance. Each stage depends on the stone type, its location, and the level of daily traffic it receives.
Natural stone surfaces fall into two broad categories based on mineral composition. Calcite-based stones like marble and travertine are highly reactive to acids. Silicate-based stones like granite and slate are more chemically resistant. This distinction drives every product and protocol decision in the process.
Design professionals should specify and document the stone care process early in projects for coordinated execution and client education. That means the process cannot be an afterthought assigned to a cleaning crew on move-in day. It must be embedded in project specifications and contractor briefings from the start.
What are the essential tools and products for stone care?
Professional-grade stone care requires the right products for each stage of the process. Using the wrong cleaner or sealer is the most common source of preventable damage on high-end surfaces.
Cleaning products and tools
- pH-neutral stone cleaners: Products like Black Diamond Stoneworks Stone and Tile Floor Cleaner are formulated to clean without disrupting the stone’s mineral surface. Standard household cleaners, including vinegar-based products, are acidic and cause immediate etching on marble and travertine.
- Microfiber cloths and mop heads: These lift debris without scratching polished surfaces. Avoid abrasive scrubbing pads on any honed or polished finish.
- Soft bristle brushes: Useful for grout lines and textured stone surfaces where microfiber cannot reach.
- Sponges: Appropriate for countertop cleaning and spill response, provided they are non-abrasive.
Sealers and protective products
| Product Type | Purpose | Key Consideration |
|---|---|---|
| Silane/siloxane impregnating sealer | Penetrates stone pores to repel water and oil | Best for porous stones like travertine and limestone |
| Fluorocarbon-based sealer | Repels both water and oil-based stains | Higher durability, suited for high-traffic floors |
| Marble polishing powder | Restores shine to etched or dull marble | Not a substitute for sealing; cosmetic use only |
| Acid-resistant protective film (e.g., Marble Armor) | Physical barrier against acid contact | Temporary solution for countertops near food prep areas |
Pro Tip: Always test your sealer on an inconspicuous area first. Some sealers darken certain stones, particularly limestone and sandstone, and that color shift is permanent.
Sealing dwell time and technique have a greater impact on sealer effectiveness than product choice alone. A premium sealer applied incorrectly will underperform a mid-range sealer applied with proper technique.
How do you clean and seal natural stone step by step?
A reliable interior stone cleaning and sealing workflow follows a defined sequence. Deviating from this order produces inconsistent results and can trap contaminants beneath the sealer.
Step-by-step sealing workflow
- Clean the surface thoroughly. Use a pH-neutral cleaner and allow full contact time. Remove all grease, residue, and construction debris. Rinse with clean water.
- Dry the stone completely. Stone must be fully dry before sealer application. Moisture trapped beneath an impregnating sealer prevents proper penetration and causes clouding. Allow 24 hours of air drying after wet cleaning, or use low-heat fans to accelerate drying.
- Apply the sealer evenly. Use a microfiber applicator pad or lint-free cloth. Work in manageable sections to maintain control over coverage.
- Maintain surface wetness during dwell time. Keep the surface wet for the full dwell time of 5–15 minutes. If the stone absorbs the sealer quickly and the surface dries before the dwell period ends, apply a second thin coat immediately.
- Buff excess sealer. Before the sealer fully cures, buff away any remaining product with a clean, dry microfiber cloth. Sealer left on the surface dries into a hazy film that is difficult to remove.
- Allow full cure time. Cure time runs 24–72 hours before the surface should be exposed to water or foot traffic. Avoid wet mopping during this window.
Timing considerations for new installations
New stone installations require 7–14 days of curing before the first sealer application. After grouting, wait 48–72 hours for the grout to cure before applying the final sealer coat. For tiled floors, the correct workflow is to apply an impregnating sealer before grouting, then clean grout haze immediately, and apply a final sealing coat once the grout has fully cured. This two-stage approach protects the stone face from grout staining and locks in the grout joints.
Pro Tip: Schedule your sealing appointment with contractors before the grout crew finishes. Grout haze that dries on unsealed stone is far harder to remove than haze on a pre-sealed surface.
How should you schedule routine stone maintenance?
Routine maintenance scheduling is where most interior design projects fall short. A single sealing at installation is not sufficient for long-term stone protection. Resealing frequency depends on stone porosity, surface use, and cleaning habits.
Condition-based vs. calendar-based resealing
Routine resealing schedules should rely on condition tests, not fixed intervals, to maximize protective benefits and avoid waste. The water absorption test is the standard method. Pour a small amount of water onto the stone surface and observe absorption. If the water beads up, the sealer is still active. If the water darkens the stone within a few minutes, resealing is needed.
As a general guideline, resealing intervals fall into these categories:
- High-traffic floors (marble, travertine): Every 1–2 years
- Kitchen countertops: Every 1–2 years due to acid exposure from food and beverages
- Bathroom surfaces: Every 2–3 years depending on cleaning product use
- Low-traffic decorative surfaces: Every 3 years or when the water test indicates absorption
Integrating maintenance into project handoff
Stone care must be part of specs and handoff documents, with responsibility shared among designers, contractors, and owners. A professional handoff package should include the stone type and finish, the sealer product used and its reapplication schedule, approved cleaning products, and emergency spill response instructions. Clients who receive this documentation maintain their surfaces correctly. Those who do not often use damaging products within months of project completion.
Pro Tip: Create a one-page stone care card for each project and laminate it. Leave it in a kitchen drawer or under the sink. Clients reference it for years, and it reflects well on your practice.
For broader floor maintenance routines that complement stone care scheduling, the same condition-based logic applies across natural surface types.
What are the most common stone care mistakes?
Several recurring errors account for the majority of preventable stone damage in residential and commercial interiors. Recognizing these mistakes is as important as knowing the correct technique.
- Sealing damp stone: Applying sealer before the stone is fully dry traps moisture and prevents proper penetration. The result is a cloudy, ineffective seal that must be stripped and reapplied.
- Using acidic or abrasive cleaners: Acidic cleaners cause etching in seconds on calcite-based stones. Vinegar, lemon juice, and many commercial bathroom cleaners fall into this category. The damage appears as a dull patch or ring where the acid dissolved the calcium carbonate at the surface.
- Ignoring grout haze: Grout haze left to dry on stone becomes a restoration problem. Remove it within 24–48 hours using a pH-neutral grout haze remover formulated for natural stone.
- Delayed spill response: Acidic contact causes permanent etch marks on marble and travertine. Wine, coffee, and citrus juice must be blotted immediately, not wiped. Wiping spreads the liquid and increases the contact area.
- Over-applying sealer: More sealer does not mean better protection. Excess product left on the surface creates a sticky residue that attracts dirt and dulls the finish.
A documented stone care process must include specific cleaning chemistry rules and immediate spill response protocols because sealing does not prevent chemical etching. Sealer repels water and oil. It does not neutralize acid.
Using eco-friendly, pH-neutral cleaning products is one of the most effective ways to protect stone finishes long-term. The chemistry of the cleaner matters as much as the cleaning technique.
Pro Tip: If a client calls about a dull patch on their marble, ask what they cleaned with before assuming the sealer failed. In most cases, an acidic cleaner is the cause, not a sealing deficiency.
Key takeaways
The interior designers stone care process succeeds when cleaning chemistry, sealing technique, and maintenance scheduling are specified together from the start of every project.
| Point | Details |
|---|---|
| Use pH-neutral cleaners only | Acidic cleaners etch calcite-based stones like marble and travertine within seconds of contact. |
| Dry stone fully before sealing | Moisture beneath an impregnating sealer prevents penetration and causes surface clouding. |
| Follow a two-stage sealing workflow | Seal before grouting and again after grout cures to protect both stone face and joints. |
| Schedule resealing by condition test | Use the water absorption test rather than fixed intervals to determine when resealing is needed. |
| Document care protocols at handoff | Include approved cleaners, sealer type, and spill response instructions in every project handoff package. |
Why stone care planning belongs in the design phase, not after
Most stone damage I see in high-end interiors is not the result of poor materials or bad installation. It is the result of a care plan that was never written down. A designer specifies a stunning Calacatta marble floor, the installer does excellent work, and then the client hands the space to a cleaning service that uses a vinegar-based product on day three. The surface loses its elegant appearance before the first dinner party.
The uncomfortable truth is that the stone care terms and protocols that protect a client’s investment are not complicated. They are just rarely communicated. Designers who build stone care documentation into their standard project deliverables see fewer callbacks, fewer restoration emergencies, and stronger client relationships.
The other thing I have learned is that sealing technique matters more than sealer brand. A professional who maintains surface wetness throughout the full dwell time and buffs carefully will outperform someone using a premium product with a rushed application. Slow down on the sealing day. It is the step that determines how the stone performs for the next two years.
Finally, early collaboration between the designer, the tile contractor, and the stone care specialist prevents the most costly mistakes. When the stone care professional is consulted before installation, the sealing workflow integrates cleanly into the construction schedule. When they are called in after damage has occurred, the options are limited and the cost is high.
— High
Protect your stone surfaces with Highlinestonecare
Interior designers working on luxury residential and commercial projects in New York City trust Highlinestonecare for advanced stone restoration and protection. Whether a project calls for marble restoration and care or a first-time sealing on a new installation, the team brings the technical depth and material knowledge that high-end stone demands.
Highlinestonecare’s Opal Luxury Anti-Acid Sealer offers permanent protection against etching and staining on marble and other calcite-based surfaces. Unlike standard impregnating sealers that require periodic reapplication, a single treatment is designed to last a lifetime. For designers who want to deliver lasting results and eliminate the risk of acid-related surface damage, this is the protection standard worth specifying. Contact Highlinestonecare to discuss sealing, restoration, and maintenance solutions for your next project.
FAQ
What is the interior designers stone care process?
The interior designers stone care process is a structured workflow covering surface preparation, pH-neutral cleaning, sealer application, and scheduled maintenance. It is documented in project specifications and handed off to clients and property managers at project completion.
How long should stone dry before sealing?
Stone must be completely dry before sealing, typically requiring at least 24 hours after wet cleaning. Moisture beneath an impregnating sealer prevents proper penetration and causes surface clouding.
How often does natural stone need to be resealed?
Resealing frequency ranges from every 1–3 years depending on stone porosity, surface use, and cleaning habits. The water absorption test is the most reliable method to determine when resealing is actually needed.
Can sealing prevent etching on marble?
Standard impregnating sealers do not prevent etching on marble or travertine. Etching is a chemical reaction between acid and calcium carbonate that occurs on the stone surface regardless of sealer coverage. Acid-resistant sealers and protective films offer additional defense.
What should a stone care handoff document include?
A complete handoff document should list the stone type and finish, the sealer product used with its reapplication schedule, approved pH-neutral cleaning products, and step-by-step spill response instructions. This documentation protects the stone investment and reduces the risk of client-caused damage after project completion.
Recommended
- Stone care terms explained: Expert guide for NYC homes
- Stone Cleaning Queens | Specialized Services – Highline Stone Care
- NYC Stone Care Guide: Expert Steps for Long-Lasting Surfaces